![[Python] OpenCV로 자율주행 만들기(Hough transform)](https://img1.daumcdn.net/thumb/R750x0/?scode=mtistory2&fname=https%3A%2F%2Fblog.kakaocdn.net%2Fdn%2Fbwm11u%2FbtrLr3qTYoI%2FIWU4p3tXzgjkIQBiKANTOk%2Fimg.png)
이번 시도에서는 원근법을 사용하여 이미지를 변형하는 방식 대신 차선 그 자체를 인식하는 방법을 사용하였다.
- 목표 : 콘 인식 및 주행
- 개발환경 : IDLE
- 언어 : python
- 방식 : 단순 알고리즘(허프 변환)
위와 같이 계획을 세우고 진행했다.
아래 코드를 요약하자면 이렇다.
#회색으로 변환한다.
#가우스 블러를 사용하여 노이즈를 없애준다.
#Canny를 사용하여 운곽선을 따준다.
#관심 영역을 설정하여 외부의 필요 없는 이미지를 가린다.
#허프 변환을 통해 나온 점들을 연결하여 선을 그린다.
#예측 선을 원래 이미지에 덮는다.
#위의 과정을 반복하여 동영상을 처리한다.
import matplotlib.pyplot as plt
import matplotlib.image as mpimg
import numpy as np
import cv2

#출처 : https://pinkwink.kr/1264

path = "../source/2022-07-04_16-10-12.mp4"
cap=cv2.VideoCapture(path)

fps = cap.get(cv2.CAP_PROP_FPS)
width  = cap.get(cv2.CAP_PROP_FRAME_WIDTH)
height = cap.get(cv2.CAP_PROP_FRAME_HEIGHT)
codec = cv2.VideoWriter_fourcc(*'DIVX')
out=cv2.VideoWriter('../output_2.mp4', codec, 30.0, (int(width),int(height)))

kernel_size=5

low_threshold=15
high_threshold=100

rho=2
theta=np.pi/180
threshold=90
min_line_len=100
max_line_gap=50

a=0.8
b=1.
theta_w=0.

def grayscale(img):
    return cv2.cvtColor(img, cv2.COLOR_RGB2GRAY)

def gaussian_blur(img, kernel_size):
    return cv2.GaussianBlur(img, (kernel_size, kernel_size), 0)

def canny(img, low_threshold, high_threshold):
    """Applies the Canny transform"""
    return cv2.Canny(img, low_threshold, high_threshold)

def auto_canny(img, sigma):
    """Applies the Canny transform"""
    v=np.median(img)

    lower=int(max(0,(1.0-sigma)*v))
    upper=int(min(255, (1.0+sigma)*v))

    return cv2.Canny(img, lower, upper)

def region_of_interest(img, vertices):
    mask=np.zeros_like(img)

    if len(img.shape)>2:
        channel_count = img.shape[2]
        ignore_mask_color=(255,)*channel_count
    else:
        ignore_mask_color=255

    cv2.fillPoly(mask, vertices, ignore_mask_color)

    masked_image=cv2.bitwise_and(img,mask)
    return masked_image

def draw_lines(img, lines, color=[255,0,0], thickness=5):
    for line in lines:
        for x1, y1, x2, y2 in line:
            cv2.line(img, (x1,y1), (x2,y2), color, thickness)

def hough_lines(img, rho, theta, threshold, min_line_len, max_line_gap):
    lines=cv2.HoughLinesP(img, rho, theta, threshold, np.array([]), min_line_len, max_line_gap)
    line_img=np.zeros((img.shape[0], img.shape[1], 3), dtype=np.uint8)
    draw_lines(line_img, lines)
    return line_img

def weighted_img(img, initial_img, a, b, theta_w):
    return cv2.addWeighted(initial_img, a, img, b, theta_w)


while cap.isOpened(): # cap 정상동작 확인
    ret, img = cap.read()
    # 프레임이 올바르게 읽히면 ret은 True
    if not ret:
        print("프레임을 수신할 수 없습니다. 종료 중 ...")
        break

    gray=grayscale(img)
    blur_gray=gaussian_blur(gray, kernel_size)

    edges=canny(blur_gray, 15, 100)
    mask=np.zeros_like(img)

    if len(img.shape)>2:
        channel_count=img.shape[2]
        ignore_mask_color=(255,) * channel_count
    else:
        ignore_mask_color=255
    imshape=img.shape

    vertices=np.array([[(0,550),
                       (500, 370),
                       (620, 370),
                       (imshape[1], 550)]], dtype=np.int32)
    cv2.fillPoly(mask, vertices, ignore_mask_color)
    masked_image=region_of_interest(edges, vertices)

    lines=hough_lines(masked_image, rho, theta, threshold, min_line_len, max_line_gap)
    lines_edges=weighted_img(lines, img, a, b, theta)

    cv2.imshow('frame1', lines_edges)
    out.write(lines_edges)

    if cv2.waitKey(25) == ord('q'):
        break
# 작업 완료 후 해제
cap.release()
out.release()
cv2.destroyAllWindows()
Python에서 OpenCV로 Canny Detection을 이용하는 차선 인식
세상에는 고수가 많고, 그 많은 고수들중 또 많은 분들이 친절(^^)합니다. 요즘은 그 많은 친절한 고수분들의 설명을 따라하는 것 만으로도 참~ 즐거운 공부가 됩니다. 오늘은.. (제가 맨날하는)
pinkwink.kr
위 사이트를 기반으로 코드를 작성하였다. 자세한 설명이 필요하다면 사이트를 방문하여 읽어보면 좋겠다.
결론적으로 이전 포스팅에서의 결과보다 더 정확했지만 콘을 인식하는 것이 아니라 차선을 인식한다는 점에서 근본적인 오류는 해결하지 못했다. 다음 파일이 결과이다.
위 현상을 해결하기 위해 먼저 전 포스트에서도 언급했듯이 차선을 인식하지 않도록 지워주는 작업을 진행해야겠다고 생각했다. 그리고 다음 시도에서는 콘을 인식하는 알고리즘을 통해 중심 좌표를 배열로 만들어서 선으로 잇는 과정을 적용해야겠다고 생각했다.
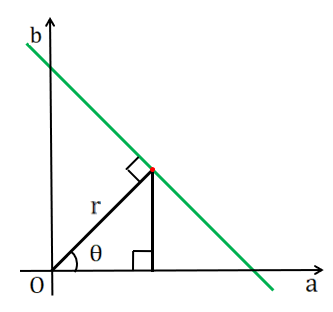
허프변환이란 특정 점들 간의 연관성을 찾아 특징을 추출하는 방법이다.
허프 변환을 사용하는 이유는 직선이 수직이라면 배열은 유한하지만 기울기는 무한하기 때문에 문제가 생기기 때문이다. 따라서 이러한 문제를 해결하기 위해 a에 관한 b로 표현된 식을 아래 보이는 θ에 관한 r로 표현된 식으로 변환해준다.
[OPENCV] 10. 이미지 프로세싱(5) - 허프 변환
☞ 메인보드 : Jetson Nano Developer Kit ☞ 운영 체제 : Ubuntu 18.04 - JetPack 4.4.1 ☞ IDE : Visual Studio Code ☞ 언어 : C++ 목차 ○ 1. 허프 변환 ○ 2. 코드 작성 ○ 3. 실행 결과 ① 허프 변환 이미지..
95mkr.tistory.com
허프 변환에 관한 설명이 필요하다면 위 블로그를 참조하길 바란다.